PolyPacket

Poly Packet is a set of tools aimed at generating serial communication protocols from embedded projects. Protocols are described in an YAML document which can be easily shared with all components of a system.
A python script is used to parse the YAML file and generate C/C++ code as well as documentation. The code generation tool can create the back end service, application layer, and even an entire linux utility app
Installation
while PolyPacket is its own package separate from mrtutils, it is automatically installed when mrtutils is installed. But if you want to install it separately you can:
pip install polypacket
Step 1: Defining a Protocol
Protocols are defined with a YAML file. To get started you can generate a sample template:
poly-make -t my_protocol
This will generate my_protocol.yml
Descriptor File
Protocols are generated using YAML. The messaging structure is made up 4 entity types:
Fields
Packets
Vals
Structs
Fields
A field is a data object within a packet. These can be expressed either as nested yaml, or an inline dictionary
Example fields:
fields:
- sensorA: { type: int16 ,desc: Value of Sensor A}
- sensorB:
    type: int
    format: hex
    desc: Value of Sensor B

- sensorsC_Z:
    type: int*24
    desc: Values for remaining 24 sensors
- type:
The data type for the field. *n indicates it is an array with a max size of n
- format:
(optional) This sets the display format used for the toString and toJsonString methods [ hex , dec , assci ]
- desc:
(optional) The description of the field. This is used to create the documentation
Supported types:
Type |
Description |
|---|---|
uint8 |
|
uint16 |
|
uint32 |
|
uint64 |
|
uint |
|
char |
|
int8 |
|
int16 |
|
int32 |
|
int64 |
|
int |
|
float |
decimal types |
double |
|
string |
array of chars |
Enum |
uint8 with named values. Each value gets a symbol in code |
flags |
Bitmask with a defined symbol in code for each bit. (maximum of 32 bits in a Characteristic) |
mask |
|
Array |
specified with <type>*<size> ex: uint16*32 is an array of 64 uint16 values |
Fields can be nested into ‘Field Groups’ for convenience
fields:
- header:
    - src: {type: uint16, desc: Address of node sending message }
    - dst: {type: uint16, desc: Address of node to receive message }
Note
these will be added to the packet as regular fields. The grouping is just for convenience
Packets
A Packet describes an entire message and is made up of fields
example Packet:
packets:
- Data:
    desc: contains data from a sensor
    fields:
        - header
        - sensorA
        - sensorB
        - sensorName
- name:
The name of the packet <br/>
- desc:
(optional) description of the packet for documentation <br/>
- response:
(optional) name of the packet type expected in response to this message (if any)
within the packet we reference Fields which have already been declared in the Fields section. these references contain 3 attributes:
- name:
The name of the field<br/>
- req:
(optional) makes the field a requirement for this packet type <br/>
- desc:
(optional) description of this field for this packet type, will override fields description in the documentation for this packet type only
Val
Val entities are used for defining options in enum and flags fields.
fields:
- cmd:
    type: enum
    format: hex
    desc: command byte for controlling node
    vals:
        - led_ON: { desc: turns on led}
        - led_OFF: { desc: turns off led}
        - reset: { desc: resets device }
In this example an enum is used to set up some predefined options for the cmd field. enums are created with sequential values starting at 0. a flags field is defined in the same way, but instead of sequential numbers, it shifts bits to the left, to create a group of individually set-able flags.
Struct
Structs are meant to store a model of an object locally. at the low level structs are essentially the same thing as packets in that they are a collection of fields. The only real difference is the name, and how they are documented.
>The purpose of structs is they make it easy to manage remote object(s). poly_packet_copy(dst,src) copies all mutual fields from src to dst, so using a single line in the handlers for the get/set packets gives us a remotely configurable node
structs:

    - Node:
        desc: struct for modeling node
        field:
            - sensorA
            - sensorB
            - sensorName
### Example of Struct usage:
sp_struct_t thisNode; //must be initialized with sp_struct_build(&thisNode, SP_STRUCT_NODE);

HandlerStatus_e sp_Data_handler(sp_packet_t* sp_data)
{

sp_packet_copy(&thisNode, sp_data); //update thisNode from incoming data packet

return PACKET_HANDLED;
}

HandlerStatus_e sp_GetData_handler(sp_packet_t* sp_getData, sp_packet_t* sp_data)
{

sp_packet_copy( sp_data, &thisNode);  //update data packet with fields from thisNode

return PACKET_HANDLED;
}
Example Protocol
Here is an example file. This is the starting point when you generate a template:
---
name: sample
prefix: sp  #this defines the prefix used for functions and types in the code. This allows multiple protocols to be used in a project
desc: This is a sample protocol made up to demonstrate features of the PolyPacket
code generation tool. The idea is to have a tool that can automatically create parseable/serializable
messaging for embedded systems

###########################################################################################################
#                                   FIELDS                                                                #
###########################################################################################################

fields:

#Fields can be nested into a 'Field Group' for convenience. They will be put in the packet just like regular fields
- header:
    - src: {type: uint16, desc: Address of node sending message }
    - dst: {type: uint16, desc: Address of node to receive message }

- sensorA: { type: int16 ,desc: Value of Sensor A}  #Simple Fields can be defined as inline dictionares to save space

- sensorB:
    type: int
    desc: Value of Sensor B

- sensorName:
    type: string
    desc: Name of sensor

- cmd:
    type: enum
    format: hex
    desc: command byte for controlling node
    vals:
        - led_ON: { desc: turns on led}
        - led_OFF: { desc: turns off led}
        - reset: { desc: resets device }

###########################################################################################################
#                                   Packets                                                               #
###########################################################################################################
packets:
- SendCmd:
    desc: Message to send command to node
    fields:
        - header
        - cmd


- GetData:
    desc: Message tp get data from node
    response: Data          #A response packet can be specified
    fields:
        - header

- Data:
    desc: contains data from a sensor
    fields:
        - header
        - sensorA
        - sensorB
        - sensorName : {desc: Name of sensor sending data }   #Field descriptions can be overriden for different packets
###########################################################################################################
#                                   Structs                                                                #
###########################################################################################################

structs:

- Node:
    desc: struct for modeling node
    fields:
        - sensorA
        - sensorB
        - sensorName
Agents
Agents allow the CLI to be extended to simulate behavior and use custom commands. They do not affect the way code is generated, they are only used when running the CLI tool.
Display custom/calculated information based on packet data
route packets to other interfaces
simulate values or responses for testing
create full a test utility which verifies data in the packets
###########################################################################################################
#                                   Agents                                                                #
###########################################################################################################
agents:
    # This creates an agent named 'node' to load it, add '-s node' when running poly packet
    # naming an agent 'default' will cause it to load automatically when the CLI is started
    - node:
        # init signature is init(service):
        # There is a global dicst named DataStore that can be used to store variables
        init: |
            DataStore['node'] = service.newStruct('Node')
            DataStore['node'].setField('sensorName', 'node01')
            DataStore['node'].setField('sensorA', 25)
            DataStore['node'].setField('sensorB', 65)
            node = DataStore['node']
            service.print('\nCreating Sensor node:\n   name: {0}\n   sensorA: {1}\n   sensorB: {2}\n'.format(node.getField('sensorName'),node.getField('sensorA'),node.getField('sensorB') ))

            def myFunc():
                service.print('myFunc called')


        #handlers fill out a function with the signature <name>_handler(service, req, resp):
        # you can print out to the console with service.print(text)
        handlers:

            #Use packets/nodes can be copied to eachother. All shared fields that are present in the source will get copied to the destination
            - SetData: |
                req.copyTo(DataStore['node'])

            - GetData: |
                DataStore['node'].copyTo(resp)

        #You can add custom commands to an agent that will be loaded in for autocomplete and help menus in the CLI
        commands:
            - rename:
                desc: renames the node
                args:
                    - name: {desc: new name for node, default: new_name}
                handler: |
                DataStore['node'].setField('sensorName', name)
                service.print('\nRenaming Sensor node:\n   name: {0}\n'.format(name))
Note
Agents can be loaded by adding the ‘-a <agent_name>’ flag when running the CLI, or using the loadAgent command in the CLI. If an agent named ‘default’ is present, it will be loaded automatically when the CLI is started.
Each agent has 3 sections:
init:
This is run when the agent is loaded. It is used to initialize the agent and set up any variables that will be used in the handlers. This block of code is executed in the global scope, so functions defined here will be available to the handlers. This section can also be used to import modules that will be used in the handlers.
handlers:
This is a list of packet handlers. The name of the handler must match the name of the packet it handles.
The signature of the handler is: <name>_handler(service, req, resp)
service - The poly packet service. This is used to access the packet data and send packets
req - The incoming request packet
resp - the outgoing response packet
commands:
This is a list of custom commands that can be run from the CLI. The name of the command is the name of the command that will be run from the CLI.The handler is a python script that will be run when the command is called.
The signature of the command handler is: <name>_cmd_handler(service, args)
service - The poly packet service. This is used to access the packet data and send packets
args - A dictionary of the arguments passed to the command. The keys are the names of the arguments and the values are the values passed in. * If no value is passed in, the default value will be used. If no default value is specified, the argument will be None * args are defined in the handler, so you can use them by name without needing to use args[‘name’]
Plugins:
Protocol files can include other protocol files. This allows you to create a library of common packets and structs that can be used across multiple protocols. To inlude a protocol file, use the Plugins directive.
plugins:
    - https://gitlab.com/uprev/public/mrt/Modules/Utilities/OTA/poly/ota-protocol.yml: {prefix: ota}
    - /path/to/protocol2.yml
Plugin paths can be local or a url.
The prefix is used to prefix all packets and fields in the plugin. This can be used to avoid name collisions between plugins and the base protocol
Step 2: Generating the Code
poly-make is the tool that will turn the yaml description into c code for projects.
poly-make -i my_protocol.yml -o . - a
- -i:
sets the input file
- -o:
tells it where to create the C files for the service
- -a:
tells the tool to create the application layer (this is not required, but is a helpful starting point)
Step 3a: Using The Code C/C++
The C code generated for the service in step 2 relies on the MrT module /Utilities/PolyPacket.
Initializing service
To initialize a service call the service_init function.
Note
all service functions are prepended with the service prefix to allow multiple services to co-exist
sp_service_init(1, 8); //initialize the service with 1 interface, and a spool size of 8
This example initalizes the service with 1 interface. An interface is an abstract port into and out of the service. If your device needs to use the protocol on multiple hardware ports (Uart, TCP/IP, SPI, etc..) each one of these would have its own interface.
The Spool size just determines how much memory the message spool (per interface) uses. With a size of 8, we can have 8 messages on the outgoing spool for each interface at a time. This really only comes into play when we are using auto-retries since packets stay on the spool until they are acknowledged or exceed the max-retry count.
Register Tx functions
For each interface we need to register a send function. This allows the service to handle the actual sending so we can automate things like acknowledgements and retries. There are two types of send callbacks that can be registered:
typedef HandlerStatus_e (*poly_tx_byte_callback)(uint8_t* data , int len);
typedef HandlerStatus_e (*poly_tx_packet_callback)(poly_packet_t* packet );
The poly_tx_byte_callback will pass the packet as an array of COBS encoded bytes which can be sent directly over a serial connection.
The poly_tx_packet_callback will pass a reference to the packet itself which can be converted to JSON, or manipulated before sending.
sp_service_register_tx_bytes(0, &uart_send ); // register sending function for raw bytes on interface 0

sp_service_register_tx_packet(0, &json_send ); // register sending function for entire packet on interface 0
once we have registered a callback for an interface, we can send messages to it using the quick send functions generated for the service.
sp_sendGetData(0); // Sends a 'GetData' packet over interface 0
Feed the service
The underlying service is responsible for packing and parsing the data. So wherever you read bytes off of the hardware interface, just feed them to the service.
void uart_rx_handler(uint8_t* data, int len)
{
    sp_service_feed(0, data, len); //feed the bytes to interface 0
}
From here the service will take care of parsing the data and dispatching messages to the proper message handler.
Sending messages
The service creates one-liner functions for easily sending simple messages
Using the example protocol we can send a message to get data from a remote device on interface 0 with:
sp_sendGetData(0); //send a 'GetData' packet over interface 0
for packet types with data fields, the datafields get turned into the arguments for the function
Note
Only ‘required’ fields can be used as arguments
sp_sendData(0, 97, 98, "My Sensor name"); //send a 'Data' packet over interface 0
Occasionally you may need to send a packet , but do not want to use the quick-send functions. an example of this would be sending a packet that includes optional fields. This can be done by using the <prefix>_packet_build function:
sp_packet_t msg;
sp_packet_build(&msg,SP_DATA_PACKET);
next we set fields in the message
sp_setSensorA(msg,97 );
sp_setSensorName(msg,"my sensor");
sp_send(0,&msg);
Important
If you build a package, but do not send it, be sure to clean it! The safest practice is to just always clean it. There is no harm in cleaning a packet that has been sent.
sp_clean(&msg);
Receive Handlers
The generated service creates a handler for each packet type, they are created with weak attributes, so they can be overridden by just declaring them again in our code. If you specify a response for a packet in the YAML, the service will initialize that packet and pass a reference to the handler.
The handler can return the following statuses:
- PACKET_HANDLED:
service will respond with the response packet (or an ack if none is specified)
- PACKET_UNHANDLED:
packet will drop through to the Default_handler
- PACKET_IGNORED:
packet will be ignored and skip the default handler
The following is our handler for ‘SetData’ type packets
/**
  *@brief Handler for receiving GetData packets
  *@param GetData incoming GetData packet
  *@param Data Data packet to respond with
  *@return handling status
  */
HandlerStatus_e sp_GetData_handler(sp_packet_t* sp_GetData, sp_packet_t* sp_Data)
{
    //set the fields of the responese packet
    sp_setSensorA(sp_Data, 97);
    sp_setSensorB(sp_Data, 98);
    sp_setSensorName(sp_Data, "My sensor");

    return PACKET_HANDLED;  //respond with response packet
}
Process
The service is meant to be run on many platforms, so it does not have built in threading/tasking. For it to continue handling messages, we have to call its process function either in a thread/task or in our super-loop
while(1)
{
sp_service_process();
}
Step 3b: Using The Code JSON
If you are working with json you can register a poly_tx_packet_callback and convert your packets to json strings for sending.
HandlerStatus_e json_send(poly_packet_t* packet)
{
    char buf[256];
    int len;

    len = sp_print_json(packet, buf); //print json string to buffer
    some_tcp_function(buf, len);      //send json string out

    return PACKET_SENT;
}
after you initialize the service, register the callback:
sp_service_register_tx_packet(0, &json_send ); // register sending function for entire packet on interface 0
Now when messages are sent out on interface 0, they will be converted to json strings and sent out with some_tcp_function.
Handling JSON packets
For handling incoming json packets, there are two options. you can feed the json message to the service for normal handling or call the json handler to bypass the normal service queue. This option makes it easy to use the service in synchronous tasks such as responding to an http request
Async JSON
void app_json_async_handler(char* strJson, int len)
{
    sp_service_feed_json(0,strJson, len);
}
Sync JSON
void app_json_sync_handler(const char* strRequest, int len, char* strResp)
{
    HandlerStatus_e status;
    status = sp_handle_json(strRequest, len, strResp);
}
PolyPacket CLI Tool
Once you have a descriptor file, you can run a live interface of the protocol using poly-packet
Open two terminals and connect them over udp to test it out:
terminal 1:
poly-packet -i sample_protocol.yml -c udp:8020
terminal 2:
poly-packet -i sample_protocol.yml -c udp:8010:8020
Note
The tool can connect over tcp, udp, and serial
The terminal interface uses autocompletion, so hit tab to show available packet/ field types. To send a packet just type the packet name followed by comma seperated field names and values.
example: .. code-block:: bash
Data sensorA: 45, sensorB: 78, sensorName: mySensor
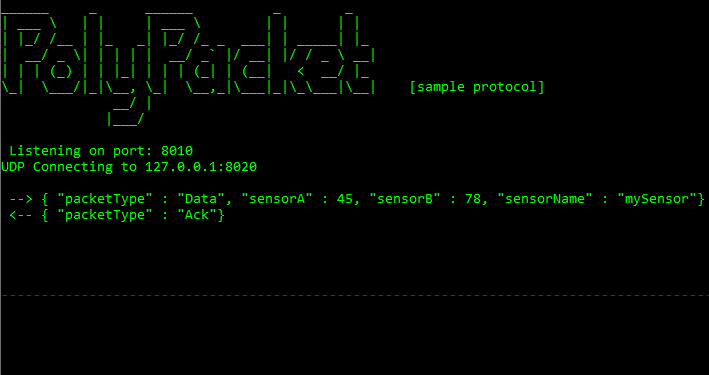
The instance of the service running on port 8020 will respond to the packet with an ‘ack’