OTA
This module provides utility functions and structs for managing OTA (Over the Air) update images in memory.
Typical OTA Update processes can be broken down into several steps:
Staging the update image (Downloading the update image to a staging area in memory)
Applying the update (Moving the update from the staging area to program memory)
Rebooting the device to run the new firmware
OTA Image Manager
The ota_img_mgr_t struct provides a way to manage multiple OTA disks. This is useful if you have multiple storage devices, such as an SD card and a SPI flash chip.
ota_img_mgr_t - Collection of ota_dsk_t structs.
ota_dsk_t - A disk is a storage device. This can be a SPI flash chip, EEPROM, embedded flash, SD card, etc.
ota_partition_t - A partition is a section of a disk. A disk can be split up into multiple partitions. Each partition contains a single image
ota_img_t - An image is a file that contains the update data. This is usually a binary file.
Initializing Staging disk
#include "ota_img.h"
ota_img_mgr_t ota_mgr;

void spi_flash_write(uint32_t addr, uint8_t *data, uint32_t len)
{
    //TODO write to flash
}

void spi_flash_read(uint32_t addr, uint8_t *data, uint32_t len)
{
    //TODO read from flash
}

int main(void)
{
    ota_img_mgr_init(&ota_mgr);

    ota_dsk_t* stagingDsk = ota_img_mgr_add_dsk(&ota_mgr, "staging", spi_flash_write, spi_flash_read);


    //If there are no partitions, add them this is first boot, create partitions
    if(stagingDsk->partitionCount == 0)
    {
        //If dsk has not been partitioned, add partitions
        ota_dsk_add_partition(stagingDsk, 0, 56000, "firmware");
        ota_dsk_add_partition(stagingDsk, 0, 56000, "fpga");
    }


}
Staging an OTA Update image
#include "ota_img.h"
ota_img_mgr_t ota_mgr;

ota_partition_t* firmware_partition = NULL;
ota_partition_t* fpga_partition = NULL;

..

void ota_firmware_block_callback(uint32_t offset, uint8_t *data, uint32_t len)
{
    ota_partition_write_image( firmware_partition, offset, data, len)
}

int main(void)
{
    ota_img_mgr_init(&ota_mgr);

    ota_dsk_t* stagingDsk = ota_img_mgr_add_dsk(&ota_mgr, "staging", spi_flash_write, spi_flash_read);

    //If there are no partitions, add them this is first boot, create partitions
    if(stagingDsk->partitionCount == 0)
    {
        //If dsk has not been partitioned, add partitions
        ota_dsk_add_partition(stagingDsk, 0, 56000, "firmware");
        ota_dsk_add_partition(stagingDsk, 0, 56000, "fpga");
    }

    firmware_partition = ota_dsk_get_partition(&stagingDsk, "firmware");

    while( 1)
    {
        //TODO Request next block from server
    }


}
Applying the Update
This step would usually take place in the bootlaoder.
If the staging area is already in a location where it can be executed, then you can just jump to that location. If there are multiple images for a ping-pong style update, then you can use the ota_dsk_get_active_partition function to get the active partition. only one partition can be active at a time. Setting a partition as active will set the other partition(s) as inactive.
#include "ota.h"
ota_img_mgr_t ota_mgr;


void stage_update() //This would be called during the staging process
{
    ota_ctx_init_staging(&spiFlash, spi_flash_write, spi_flash_read);
    ota_img_mgr_init(&ota_mgr);
    ota_dsk_t* stagingDsk = ota_img_mgr_add_dsk(&ota_mgr, "staging", spi_flash_write, spi_flash_read);

    ota_partition_t* partA = ota_dsk_get_partition(stagingDsk, "firmwareA");
    ota_partition_t* partB = ota_dsk_get_partition(stagingDsk, "firmwareB");

    if(partA->flags && OTA_PARTITION_FLAG_ACTIVE)
    {

        //TODO Write new image to partB

        ota_partition_set_active(partB);
    }
    else
    {
        //TODO Write new image to partA
        ota_partition_set_active(partA);
    }

}


int launch_application(void)  //This would be called during the boot process
{

    ota_img_mgr_init(&ota_mgr);
    ota_dsk_t* stagingDsk = ota_img_mgr_add_dsk(&ota_mgr, "staging", spi_flash_write, spi_flash_read);


    //Get the active partition
    ota_partition_t* active_part = ota_dsk_get_active_partition(stagingDsk); //This will return partA if it is active, or partB if it is active.
    printf("Active partition is %s", active_part->label  );
    //Jump to active_part->image.addr
}
If the staging area is not an executable location, then you will need to copy the image to an executable location. This can be done manually, or by giving the ota_dsk struct a read and write callback for the destination dsk and using the ota_partition_apply_update function. This function will copy the image to the destination and then verify it with the provided CRC32.
#include "ota.h"
#include "crc32.h"
ota_img_mgr_t ota_mgr;

ota_dsk_t* stagingDsk = NULL;
ota_dsk_t* nvsDsk = NULL;

#define BLOCK_SIZE 256
#define APPLICATION_ADDR 0x10000

mrt_status_t nvs_write(uint32_t addr, uint8_t *data, uint32_t len)
{
    //TODO write to nvs
}

mrt_status_t nvs_read(uint32_t addr, uint8_t *data, uint32_t len)
{
    //TODO read from nvs
}

int main(void)
{
    mrt_status_t status = MRT_STATUS_OK;
    ota_ctx_init(&ota, spi_flash_write,  spi_flash_read, nvs_write, nvs_read);

    ota_img_mgr_init(&ota_mgr);
    stagingDsk = ota_img_mgr_add_dsk(&ota_mgr, "staging", spi_flash_write, spi_flash_read);
    nvsDsk = ota_img_mgr_add_dsk(&ota_mgr, "nvs", nvs_write, nvs_read);

    ota_partition_t* firmware_staging_partition = ota_dsk_get_partition(stagingDsk, "firmware");
    ota_partition_t* firmware_exec_partition = ota_dsk_get_partition(nvsDsk, "firmware");


    //IF the firmware partition is not null and the new flag is set, then apply the update
    if((firmware_staging_partition == NULL) && (firmware_partition->flags && OTA_PARTITION_FLAG_NEW) && (firmware_exec_partition != NULL))
    {

        status = ota_partition_copy(firmware_staging_partition, firmware_exec_partition);//This will copy the image from the staging area to the destination address in NVS, then verify it with the CRC32


        if(status == MRT_STATUS_OK)
        {
            //TODO - JUMP TO  firmware_exec_partition->image.addr
        }
        else
        {
            //TODO - handle error
        }

    }
    else
    {
        // No new update in staging area, jump to application
        //TODO - JUMP TO firmware_exec_partition->image.addr
    }


}
OTA XFer
ota_xfer.h/c provides an ota trasnfer utility. This utility can be used to manage the transfer of an OTA image from a server (or host) to the staging area. It will keep track of which blocks have been received, and which blocks are missing. It will also keep track of the state of the transfer, and verify the image with the provided CRC32.
#include "ota.h"
#include "ota_xfer.h"

ota_img_mgr_t img_mgr;
ota_xfer_t xfer;
ota_partition_t* firmware_partition = NULL;


//Callback when block data packet is received
void ota_firmware_block_callback(uint32_t offset, uint8_t *data, uint32_t len)
{
    ota_partition_write_image( firmware_partition, offset, data, len)

    ota_xfer_write_block(&xfer, offset, data, len);

    if(xfer.state == OTA_STATE_FINISHED)
    {
        Reset the device
    }

    //TODO request next block
}

//Call back when ota start packet is received
void ota_xfer_callback(const char* label, const char* strVersion, uint32_t size, uint32_t crc)
{
    //Kick off new transfer
    ota_xfer_init(&xfer, &ota, label, strVersion, size, crc);

    ota_xfer_set_state(&xfer, OTA_STATE_BULK);
}

int main(void)
{
    //Set up staging
    ota_img_mgr_init(&img_mgr);
    ota_dsk_t* stagingDsk = ota_img_mgr_add_dsk(&img_mgr, "staging", spi_flash_write, spi_flash_read);
    firmware_partition = ota_dsk_get_partition(stagingDsk, "firmware"); //This will return the firmware partition if it exists, or NULL if it does not exist

    if(firmware_partition == NULL)
    {
        //TODO - handle error
    }

    while(1)
    {
        if(xfer.state == OTA_STATE_BULK)
        {

            //Get next missing block
            uint32_t nextBlock = ota_xfer_get_next_missing_block(&xfer);
            if(nextBlock > -1)
            {
                request_image_block(nextBlock * ota->blockSize, ota->blockSize);
            }
        }
    }


}
PolyPacket Protocol
Included in this module is a PolyPacket protocol descriptor file poly/ota-protocol.yml. This file can be used to generate a PolyPacket protocol for OTA transfers. The protocol can be used by itself or included in a larger protocol as a plugin.
Generating protocol service
For information on generating code for the ota protocol service, see the PolyPacket documentation.
Pushing Images to device
The protocol descriptor includes Agent profiles for the otaHost and otaDevice. The otaDevice agent simply simulates a device that can receive OTA images, and can be used for testing. The otaHost agent can be used as a utility for reading partitions and trasnfering images to the device.
Setup a simulated device with the otaDevice agent.
poly-packet -i ota-protocol.yml -a otaDevice -c tcp:8020
This will start a simulated device that will listen for connections on port 8020.
Setup the otaHost agent to connect to the device. Run the following command in a new terminal window.
poly-packet -i ota-protocol.yml -a otaHost -c tcp:localhost:8020
This will start the otaHost agent and connect to the device.

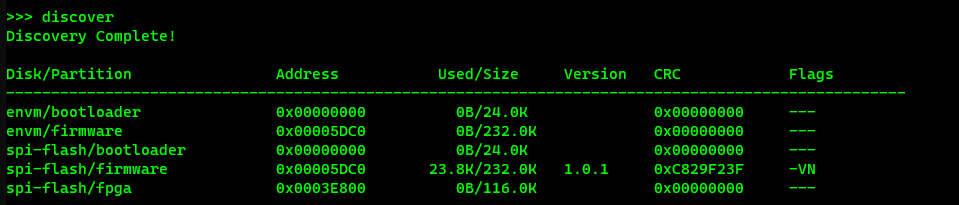
Run the discover command to get a list of partitions on the device.
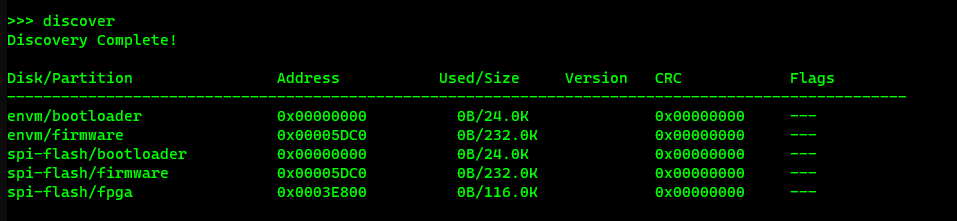
Use the flash command to transfer an image to the desired partition.
flash file: firmware.hex, version: 1.0.1, partition: spi-flash/firmware

Note
The CLI has tab complete which will show available commands and arguments
Run the discover command again to verify that the image was transferred. The V flag on the partition indicates the device has verified the image with the CRC sent by the host.